
Annotation Preview Plugin User Manual
Table of Contents
- Introduction
- What You Can Do with the Annotation Preview Plugin
- System Requirements
- Installation
- License Activation
- Plugin Overview
- How to Add a Note
- How to Edit a Note
- How to Delete or Close a Note
- Managing Notes in the WordPress Admin
- Using Preview Links
- Note Visibility and Display Options
- Recommended Workflow
- Common Use Cases
- Troubleshooting
- Frequently Asked Questions
- Support and Updates
- Conclusion
Introduction
Purpose of the plugin
Website Annotations and Client Notes is a WordPress plugin that helps you communicate directly on the page while a website is being designed, revised, or reviewed. Instead of relying on scattered emails, phone texts, screenshots, and spreadsheets, you can place notes exactly where a change, question, or issue belongs.
The goal is simple: make website communication clearer, reduce project delays, and help teams and clients stay on the same page.
Who it is for
This plugin is designed for:
- web designers
- agencies
- freelancers
- developers
- clients reviewing websites
- internal teams
If multiple people are involved in reviewing a website, this plugin helps keep communication organized and tied to the page on the website itself.
What problem it solves
Website projects often slow down because communication gets spread across too many places. One person sends an email, another sends a text, someone else marks up a screenshot, and soon nobody is fully sure which comment is current.
Website Annotations and Client Notes helps reduce that confusion by letting users place notes directly on the live page. That keeps comments visual, clear, and easier to act on.
What You Can Do With the Plugin
Core uses
With this plugin, you can:
- add notes directly on the frontend of a live webpage
- mark areas that need changes
- share comments with clients
- review layouts and content
- track open and completed notes
- use preview links for outside reviewers
Typical use cases
This plugin works well for:
- client revision rounds
- internal design review
- development punch lists
- QA checks
- content placement notes
- website maintenance reviews
- System Requirements
WordPress requirements
Before installing the plugin, make sure you have:
- a working WordPress website
- administrator access for installation and license activation
- a current version of WordPress and PHP that matches your hosting provider’s recommended setup
This plugin is especially useful in Divi theme-based workflows.
Recommended environment
For the best experience, use:
- a modern desktop browser
- a staging site for testing when possible
- a clean caching setup while reviewing notes
If your site uses aggressive cache plugins or server-side caching, clear cache after major note changes if something does not appear correctly.
- Installation
Installing the plugin
To install the plugin:
- Download the plugin ZIP file from your purchase email or account area.
- In WordPress, go to Plugins > Add New Plugin.
- Click Upload Plugin.
- Select the ZIP file.
- Click Install Now.
- After installation, click Activate Plugin.
What happens after activation
Once activated, the plugin adds its related menu items and management areas in the WordPress admin. From there, you can activate your license, manage notes, and work with preview links if enabled.
License Activation
How to activate the license
To activate your license:
- Open the plugin’s license settings page in the WordPress admin (Annotation Preview > License).
- Paste your license key into the license field.
- Click Save or Activate License, depending on the screen.
- Wait for the confirmation message.
A successful activation should show that the license is active and ready for updates.
Keeping your license active is important because future feature enhancements and improvements will be delivered through plugin updates.
License notes
A single-site license means the plugin can be activated on one website at a time.
Your purchase includes:
- one site license
- 12 months of updates
- the ability to deactivate and transfer the license to another site if needed
Renewal is optional, but an active license is required to continue receiving updates and support.
Plugin Overview
Frontend tools
On the front end of the website, the plugin gives you tools for placing and reviewing notes directly on the page.
These tools include:
- annotation circles
- a note box for written comments
- show or hide note controls
- moveable notes
- style-related controls if enabled in your version
Notes can be repositioned as needed, which makes it easier to fine-tune where a comment appears on the page.
Backend tools
In the WordPress admin, the plugin provides management tools for reviewing and organizing communication.
These tools may include:
- open notes
- completed notes
- note management and logging
- creator and editor information
- preview link management
This gives you both a visual review system on the front end and an organized communication record in the backend.
How to Add a Note
Basic workflow
To add a note:
- Log into the website as an admin and open the page you want to review on the front end of the website.
- Enter annotation mode by clicking show/hide Annotations toggle in top admin menu.
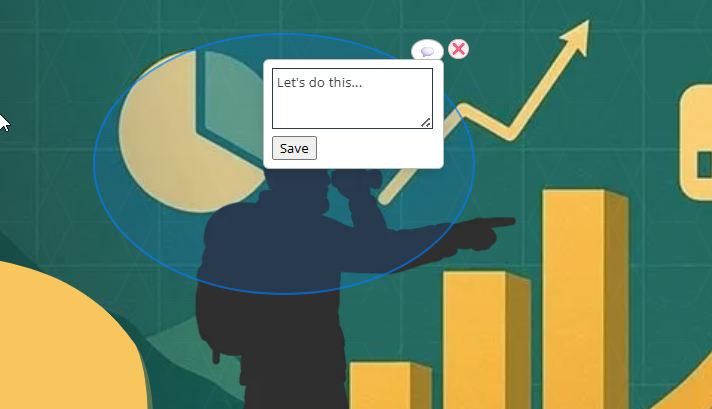
- Click-and-drag to create a circle to mark the area where the note should appear.
- Click on the message icon, and type your note into the note box.
- Click the 'Save' button to save the note.
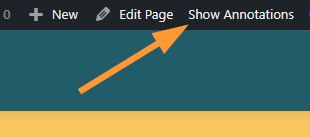
To create a note, click “Show Annotations” in the top admin bar. Then click and drag your mouse to draw a circle around the area you want to highlight. Click the message icon to open the note field, type your message, and click “Save.” You can reposition the note at any time by clicking and dragging the circle.
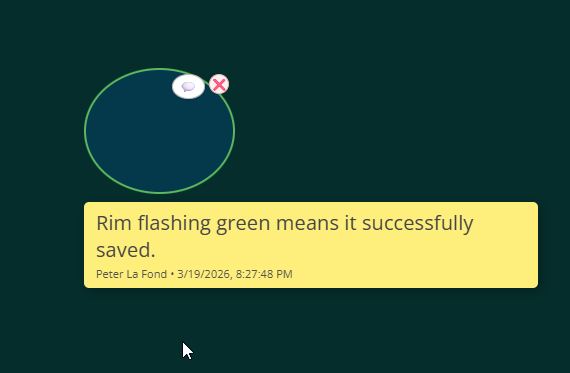
IMPORTANT: At the time of saving your note, pay attention to the visual rim of the circle you drew; the plugin uses color indicators. A green rim flash indicates the note has been saved successfully. A red rim flash indicates the note has not been saved or still needs attention. A red rim may indicate caching is preventing the note from being saved, or you may need to contact support. If a red rim is persistent, turn off caching, or CDN, and test again.
What an effective note looks like
The best notes are:
- specific
- tied to one clear issue
- make it concise and easy to understand
Try to avoid broad or vague comments. A short, direct note is usually better than a long explanation.
Example of a clear note: “Please move this button higher by approximately 15px.”
Example of a vague note: “This part needs work.”
The clear note works because it points to a specific change and gives enough detail for someone to act on it quickly. The vague note can create confusion because it does not explain what needs to change, where the issue is, or what outcome is expected.
How to Edit a Note
Editing process
To edit an existing note:
- Open the note on the page.
- Click on message icon. Update the text.
- Save the note again.
This is useful for clarifying comments, correcting wording, or updating a request after a discussion.
Metadata behavior
The plugin can show note-related metadata so users can understand who created a note and who last updated it.
Important behavior to know:
- the original creator of the note remains associated with the note
- the last editor may also be displayed separately
- admins have universal editing access to notes
- authors can edit only their own notes
- preview mode is read-only
That means outside reviewers using a preview link can view notes, but they cannot edit them unless they are using the site in an authorized editing context.
How to Delete or Close a Note
Removing a note
If a note is no longer needed, you can delete it permanently using the available note controls in the admin backend.
Delete a note when:
- it was created by mistake
- it is duplicated
- it is no longer relevant and should not remain in the record
Completing a note
If a note has been addressed, mark it as completed or resolved instead of deleting it. On the frontend of the website, click the 'x' icon located on the note to remove a completed note.
Use completion when:
- the requested change has been made
- the issue has been reviewed and closed
- you want to preserve the note as part of the project record
Deleting removes the note. Completing keeps a record that the item existed and was handled.
Managing Notes in the WordPress Admin
All Open Notes
The All Open Notes area in the WordPress admin is where you review active notes.
There you can typically see:
- the note content
- where the note appears
- who created the note
- who last edited the note
- the note’s current status
This area is helpful when you need a broader view of what still needs attention across a page or project.
Completed notes
Completed notes are stored separately, in the Deleted Notes admin area, so you can look back at resolved items later.
This is helpful when:
- you want to confirm that a request was handled
- you need to reference old notes for a client discussion
- you want to copy completed tasks into a client email or summary
A useful workflow is to review completed notes, copy the resolved items, and paste them into a status update or completion email for the client.
Why this matters
This backend record gives your team a cleaner communication trail. Instead of searching through scattered emails and screenshots, you have a central place to review what was requested, what is still open, and what has already been completed.
Using Preview Links
What preview links do
Preview links allow clients or outside reviewers to view notes without needing a WordPress login. Preview mode is read-only, so reviewers can see notes but cannot edit them.
This is helpful when you want someone to review the page and see the comments in context, but you do not want to create a full WordPress user account for them.
How to create a preview link
To create a preview link:
- Open the preview link section in the plugin or admin area.
- Generate a new link.
- Copy the link.
- Send it to the client or reviewer.
When to use preview links
Preview links are useful for:
- client reviews
- stakeholder approvals
- outside feedback sessions
Important notes
Keep these points in mind:
- preview links may expire
- they should be shared only with the intended reviewer
- preview mode is read-only
- preview mode includes a Hide/Show toggle in the lower right-hand corner of the screen so user can hide notes
- during a live review conversation, someone using preview mode may need to refresh their browser page to see newly created or edited notes in real time
- if a link no longer works, you may need to generate a new one
Recommended Workflow
Suggested client workflow
A simple workflow for using the plugin looks like this:
- install and activate the plugin
- enable notes on review pages
- place notes during review
- share a preview link
- resolve notes in admin
- close out completed items
Best practices
To get the best results:
- keep one topic per note
- avoid vague comments
- use notes during live review calls
- review and close notes regularly
- use staging when possible
This keeps the communication process focused and easier to manage.
Common Use Cases
For agencies
Use the plugin during client revision rounds, design reviews, and approvals so your team can keep communication tied to the page.
For freelancers
Use it to organize comments and client requests without needing extra collaboration software.
For internal teams
Use it for design, development, and content coordination when multiple people need to review a page.
For maintenance projects
Use it to log requested updates and keep an organized record of ongoing page changes over time.
Troubleshooting
Notes are not showing
If notes are not appearing:
- confirm the plugin is active
- check the note visibility toggle
- refresh the page
- purge website cache if needed
- confirm the user has the right permissions
In some cases, website cache plugins may prevent new notes from appearing correctly until cache is cleared.
Preview link is not working
If a preview link does not work:
- check whether the link has expired
- confirm you copied the full URL
- generate a new preview link if needed
Notes appear differently after refresh
If the notes look different after reloading the page:
- confirm the note was fully saved
- clear cache
- review plugin settings
- retest after refreshing the page
Plugin conflicts or display issues
If you suspect a conflict:
- test with other plugins temporarily disabled if appropriate
- test on a staging site
- review whether the issue is theme-related
- contact support if needed
Frequently Asked Questions
Can clients use the plugin without a login?
Yes. Preview links allow outside reviewers to view notes without needing a WordPress login.
Can I use it on a live site?
Yes. Many users work with it on live sites, though a staging site is recommended for initial buildout, repeated testing, and complex review workflows.
Does it work with Divi?
Yes. The plugin is especially useful in Divi-based workflows.
Can I move the license to another website?
Yes. You can deactivate the license from one site and transfer it to another if needed.
Are notes stored in WordPress?
Yes. Notes are managed within WordPress and can be reviewed through the admin areas provided by the plugin.
Can I hide notes without deleting them?
Yes. You can toggle note visibility without removing the notes themselves.
What is the difference between open and completed notes?
Open notes still need attention. Completed/Deleted notes have been resolved and remain available as part of the project record.
Support and Updates
Where to get help
If you need help, use the plugin support contact (at support@myinternetscout.com) provided with your purchased license key.
When contacting support, include:
- your website URL
- your current license key
- your plugin version
- a short description of the issue
- a preview link or screenshots are helpful
- steps to reproduce the issue if possible
Updates
Plugin updates are delivered through the license system while your license is active.
Before updating:
- back up your website
- review the update details
- test on staging first when possible
Keeping your license active is the best way to receive feature enhancements, maintenance updates, and compatibility improvements.
Conclusion
Final summary
Website Annotations and Client Notes is designed to improve website communication by keeping comments tied directly to the page on the website.
That helps reduce confusion and keep projects moving. The plugin gives you a clearer way to manage website communication inside WordPress. Do not forget to connect your license key for future updates.